I remember the morning I pulled up my utility app, coffee in hand, and almost choked. My monthly bill had spiked by nearly $160. Was that the new car? Was it the AC running overtime? Or did my teenager leave a space heater on in the basement? I realized then that I was flying blind. I had spent all this money on a shiny new electric vehicle to save on gas, but I had no earthly idea what it was actually costing me to keep it fueled at home. I tried to estimate it using my car’s app, but between the ‘vampire drain’ while parked and the inherent energy losses during the charging process, the numbers just didn’t add up. [IMAGE_PLACEHOLDER]
Stop Guessing How Much Your EV Costs to Charge
If you have ever felt like your wallet is leaking money but you can’t quite find the hole, then sub-metering is the solution you’ve been looking for. Most people just plug in and hope for the best, only to wonder later why your electricity bill doubled after installing a charger. When I first started out, I made the classic rookie mistake of assuming my car’s dashboard was 100% accurate. I later learned from a study by the Idaho National Laboratory that charging losses can account for 12% to 25% of the total energy drawn from the wall, meaning my ‘estimates’ were way off. By installing a dedicated sub-meter, you get the hard data you need to truly see your ROI. This is especially vital if you share a driveway with a neighbor or if you are trying to see how to tell if your utility company offers off-peak charging rates that actually make a dent in your costs. Today, I am going to walk you through how to get this set up correctly so you can stop the guesswork and start managing your energy like a pro. Have you ever looked at your electric bill and wished you could see exactly what the car was doing?
Is a dedicated meter really worth the hassle?
Many of my neighbors ask if this is just another layer of over-complicated tech. The truth is, it’s about control. Without a meter, you might not realize that why your smart charger isnt saving you money on your bill is due to poor configuration or charging at the wrong times. Beyond the savings, it’s about safety and how to verify code compliance for your ev charger installation. Adding a meter requires a bit of wiring finesse, but it ensures that your EV circuit is monitored and accounted for separately from your dryer or oven. It turns a mystery expense into a manageable line item. Before we dive into the wire gauges and torque settings, let’s get the foundation right.
Map Out Your Home Electrical Capacity First
Before you buy a single piece of hardware, you have to know if your house can actually support the extra draw. Think of your electrical panel like a highway; if every lane is already full of cars—your AC, your oven, and your dryer—adding a massive EV ‘semi-truck’ is going to cause a gridlock of tripped breakers. This is precisely why your ev permit application requires a load calculation worksheet. You need to sum up your existing ‘fixed’ loads to see if you have enough headroom. If you find your panel is already redlining, you might be looking at upgrading your panel for better ev charging performance. I once worked with a homeowner who tried to skip this step, and his main breaker tripped every time his wife started the dishwasher while the car was charging. It wasn’t just annoying; it was a sign the system was dangerously overloaded.
The Math Behind the Load Calculation
You aren’t just looking at the number printed on the main breaker. You have to apply demand factors. Most codes allow you to assume that not every appliance is on at the same time, but the EV charger is a ‘continuous load,’ meaning it runs at full tilt for hours. This is why your electrician recommends a 60 amp circuit for a 48 amp charger—you need that 20% safety margin to prevent the wires from becoming heating elements inside your walls.
Select Hardware That Handles the Heat
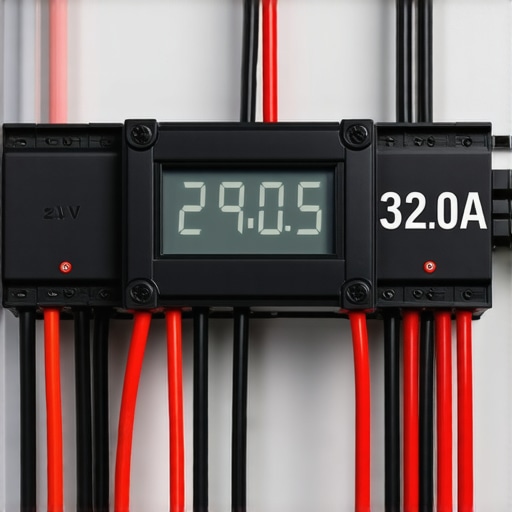 When choosing a sub-meter, you have two real paths: an inline meter that sits inside a small enclosure or a CT-clamp system that ‘listens’ to the electricity flowing through the wires. If you want the most accurate data for billing or tax credits, go with an inline DIN-rail meter. It is physically spliced into the circuit, so every electron has to pass through it. Ensure the meter is rated for the amperage you are pulling. If you are using the exact wire gauge you need for a 50 amp ev circuit, your meter needs to match those lugs. A cheap, under-rated meter will become a point of failure and could eventually melt or catch fire.
Nailing the Torque and Wire Connections
This is the part where most DIYers and even some pros get sloppy. I learned this the hard way on my second install. I tightened the lugs ‘by feel,’ thinking my years of wrenching on cars gave me a calibrated wrist. Six months later, I opened the box to find the insulation on the hot wire was bubbling and brown. The connection was just loose enough to create resistance, and resistance creates heat. Now, I never touch a meter without a calibrated torque screwdriver. Why your charger needs a specific torque setting to pass inspection is a rule written in the ashes of house fires.
The Final Wiring Tweaks
Once your meter is physically mounted, you need to ensure the communication lines or the display are visible without exposing yourself to live busbars. You should also look into the grounding trick that fixes intermittent charging errors—specifically ensuring your sub-meter doesn’t create a ‘ground loop’ that confuses the sensitive electronics in your car’s onboard charger. Follow the wiring diagram to the letter, and always double-check that you are ensuring code compliance when installing ev chargers by using the correct outdoor-rated enclosures if your meter isn’t inside the main house.The biggest myth I see in the EV community is the belief that a 200-amp service panel is an automatic green light for any charger. Everyone tells you to just check the main breaker, but in my experience, the actual busbar capacity and existing ‘hidden’ loads matter more. I’ve encountered homeowners who were told by general contractors that a 200-amp service is an ‘infinite pool’ of energy. It isn’t. This is exactly why your ev permit application requires a load calculation worksheet. I’ve seen 200-amp panels that were actually at 95% capacity because of electric saunas or old-school resistant heating. If you’re pushing the limit, look into how to add an ev charger without a 200 amp panel upgrade by using load-shedding devices. These gadgets are the secret sauce that saves you thousands in utility upgrades by intelligently pausing the car when the dryer is running.
Stop Overlooking Mandatory Surge Protection
Most people forget that an EV is essentially a massive, expensive battery connected to your home’s nervous system. According to the National Electrical Code (NEC) Section 230.67, surge protection is now a requirement for all new and replaced service equipment in dwellings, yet many DIYers skip the why your main service panel needs a surge protector for your ev part. Without it, a lightning strike miles away can travel through the grid and fry your charger’s brain or, worse, your car’s inverter. I’ve had clients lose $2,000 wallboxes in a single summer storm because they thought ‘it wouldn’t happen to them.’
Is your charger making a clicking sound but not starting?
This is a classic symptom of a faulty relay or a voltage drop issue. If you hear that rhythmic clicking, you might need to how to diagnose a faulty internal relay in your charging station. Usually, it’s either the unit failing internally or the specific wire gauge that prevents voltage drop over long runs was ignored during the install. Voltage drop is a silent killer of electronics; if the wire is too thin for the distance, the voltage ‘sags,’ and the charger’s safety relays will disconnect to protect the car.
Why the Double-GFCI Setup Fails
Another nuance that trips up even seasoned pros is the ‘GFCI conflict.’ If you’re using a plug-in model, you probably have a GFCI breaker in your panel. However, most EVSEs have built-in GFCI protection. When you stack two GFCIs on the same line, they ‘talk’ to each other in a way that causes the circuit to pop for no reason. This is why the gfci in your panel keeps nuisance tripping your charger. Hardwiring the unit bypasses the need for the panel-level GFCI and provides a much more stable connection. #IMAGE_PLACE_HOLDER_C# I also want to warn you about the hardware itself. I’ve seen people buy beautiful chargers only to find out the specific breaker brands that are known to overheat with evs make their setup a fire hazard. Not all breakers are created equal, and some older ‘stab-in’ styles just can’t handle the 8-hour continuous draw of an EV. If you’re seeing discolored plastic, stop immediately. It’s a sign of troubleshooting-ev-chargers-common-compliance-pitfalls-and-fixes that you need to address before your next charge. Have you ever fallen into the trap of assuming ‘plug and play’ meant ‘safe and sound’? Let me know in the comments.Even after you have passed your inspection, you aren’t truly done. I treat my EV circuit like a high-performance engine that needs a regular tune-up. Every twelve months, I kill the power at the main breaker and open my sub-meter box because I am looking for one thing: thermal stress. Copper expands and contracts as it heats up during those heavy charging sessions, and over time, why your main lugs might be loose after a year of charging becomes a very real concern. I grab my torque screwdriver and verify everything is still at the manufacturer-specified inch-pounds. If you skip this, you are practically inviting the reason your ev charger smells like burnt plastic to manifest right in your garage. 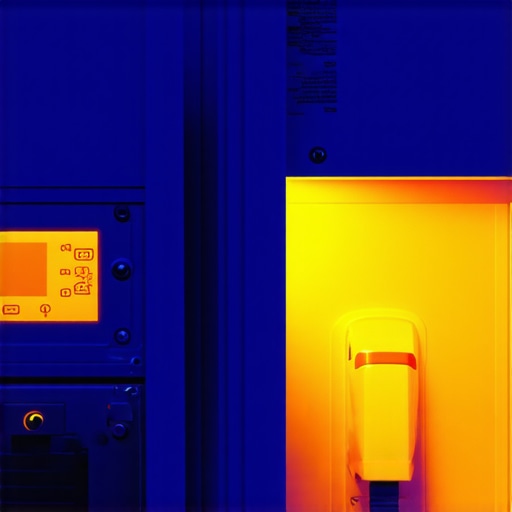
The Diagnostic Tool That Saves My Sanity
I also swear by my FLIR thermal camera. You do not need a pro-grade unit; a simple smartphone attachment works wonders. By scanning the breaker while the car is pulling full power, you can see if one wire is running significantly hotter than the rest. This is a pro-level way of troubleshooting ev chargers common compliance pitfalls and fixes before a component actually fails. It is also the fastest way to see if the specific breaker brands that are known to overheat with evs are starting to lose their integrity. According to the NFPA 70B standard for electrical equipment maintenance, loose connections are the leading cause of electrical failure in high-load environments, and your EV charger is essentially an industrial load in a residential setting.
How do I keep my charging speeds from dropping as the system ages?
Beyond the physical wiring, you have to manage the software side. I recommend that you check for updates monthly to how to update the firmware on your smart charging station. These updates often fix ‘vampire’ bugs where why your charging station is stuck in waiting mode for no apparent reason. Looking ahead, I suspect we will see dynamic load management become the standard for every home. We are already seeing how smart chargers use dynamic balancing to prevent blown fuses, which allows you to scale up to two or three cars without a massive panel upgrades for ev chargers what you need to know. My challenge for you: Go out to your garage tonight and check your charging cable for stiffness or discoloration. If it feels brittle or shows signs of wear, check out why your charging cable is stiff in the winter and what to do to prevent a port failure.
What I Learned After 500 Charging Cycles That Most Manuals Skip
One of the biggest realizations I had wasn’t about the savings, but about the ‘drift’ in hardware performance. Even with a perfect install, vibration and thermal expansion are real. If I could go back, I’d tell myself that being a pro isn’t about never having problems, it’s about spotting them before they become an emergency. This is why I always emphasize how to verify code compliance for your ev charger installation even years after the initial permit was signed.
Another lightbulb moment? Your home network is just as important as your copper wiring. I spent weeks frustrated by data gaps until I realized troubleshooting ev charger connectivity problems often comes down to signal interference from the metal casing of the panel itself. Don’t let a bad Wi-Fi signal ruin your data tracking.
Lastly, remember that codes change. Staying current with code compliance essentials for ev charger installations in 2025 is the only way to ensure your insurance company stays happy if the worst ever happens. It’s not just red tape; it’s your safety net.
#IMAGE_PLACEHOLDER_E#
The Toolkit That Keeps My Garage Safe
I don’t believe in buying every gadget on the shelf, but there are a few non-negotiables that have saved me from major headaches. First, a high-quality torque screwdriver is your best friend to prevent loose lugs and thermal damage. Second, I frequently refer to the official NFPA 70 guidelines to stay ahead of the curve. If you’re ever feeling stuck, checking out ev charger troubleshooting expert tips for common issues can save you a $200 electrician visit for a simple fix.
For those looking at the big picture, I recommend keeping a digital folder with your original load calculations and photos of the wiring. This makes upgrading your panel for better ev charging performance much easier down the road if you decide to add a second vehicle or a home battery system.
Take Charge of Your Energy Future
Transitioning to an electric vehicle is more than just a change in how you get from point A to point B; it’s a shift in how you interact with your home’s infrastructure. By taking the time to meter your usage, verify your torque settings, and respect the electrical load of your house, you’re not just saving a few cents per kilowatt-hour—you’re building a smarter, safer home. It’s a journey of continuous improvement, and you’re now better equipped than 90% of the EV owners on the road. Have you ever run into a situation where your charger’s data didn’t match your utility bill? Let me know in the comments below!