I remember the exact moment I realized my EV charging cable was toast. It was a drizzly Tuesday, and as I reached for the handle, I felt a strange, jagged texture under my palm. There it was: a nasty tear in the outer jacket, exposing the copper shielding. My first thought? ‘Well, there goes seven hundred bucks.’ I assumed the whole station was a sealed brick, destined for the scrap heap. But here is the secret the manufacturers don’t exactly broadcast: most of these units are surprisingly modular. I spent the next few hours digging into the internals and realized that swapping a frayed cord is a lot like replacing a heavy-duty power tool lead—intimidating at first, but totally doable if you know which end of a screwdriver to hold.
Stop Buying New Stations for One Bad Cord
If your charging station is still powering up and the LEDs aren’t screaming error codes at you, the ‘brain’ of the unit is likely perfectly healthy. Paying for a whole new motherboard and enclosure just because the rubber cord got pinched in the garage door or chewed by a rogue rodent is a massive waste of money. We are going to solve this today. I am going to walk you through how to open the case, identify the terminal connections, and most importantly, how to spot a cheap knockoff charging cable before it melts so you don’t trade a frayed wire for a serious fire hazard. My goal is to get your car back on the road without that ‘new equipment’ price tag.
Is it really safe to DIY a high-voltage cable?
I get the skepticism. High-voltage electricity is no joke, and 240 volts isn’t something to mess with if you are being careless. Early on in my DIY journey, I made a classic amateur mistake: I thought I could ‘patch’ a small nick with several layers of high-grade electrical tape. It worked for about a week until the intense heat from the 40-amp current caused the adhesive to fail, and the cable started to smoke. That is exactly the mistake that causes ev charger motherboards to fry or components to fail prematurely—underestimating the heat generated by sustained high-amperage draws. Fixing it the right way means a full cable replacement, not a band-aid. According to the NFPA (National Fire Protection Association), electrical failures or malfunctions are a leading cause of home fires, so doing this by the book is non-negotiable. Have you noticed any weird heat or fraying on your own cable lately? If you’re seeing signs that your ev plug contacts look burnt, it is time to act before the damage spreads to the internal relays of the station itself. Let’s get into the gear you’ll need to save your station and your sanity.
Kill the Breaker Before You Do Anything Else
It sounds obvious, but you would be surprised how many people think they can just ‘be careful’ while the circuit is live. Flipping the switch at the wall unit is not enough; you need to go to your main service panel and physically throw the breaker to the ‘off’ position. I treat every wire like a loaded gun until I’ve touched my non-contact voltage tester to it and seen that beautiful, silent green light. If you are worried about the load your system is handling while you’re poking around, this is a great time to review the hidden cost of skipping a panel load calculation to ensure your setup is actually optimized for the current you’re pulling.
Open the Housing Without Breaking the Seals
Most home stations, like the ChargePoint Home or the Tesla Wall Connector, use T20 or T25 Torx security screws. Don’t try to force these with a flathead; you’ll just strip the head and end up drilling out the casing. Once you’re inside, you’ll see the ‘brain’ (the PCB) and the heavy-duty contactors. This is the moment where most people freeze up because it looks like a computer, but remember: we are only interested in the thickest wires—the ones leading from the cable to the terminal block. If you notice any soot or discoloration on the board while you’re in there, you might need to diagnose a faulty internal relay in your charging station before finishing the repair.
Swap the Leads at the Source
When you disconnect the old, frayed cable, take a photo of the wiring configuration first. Most Level 2 cables have three or four wires: two hots (usually black and red), a ground (green), and sometimes a smaller data wire for the pilot signal. I once rushed this on an old ClipperCreek unit and swapped a hot with the ground. The moment I flipped the breaker, the resulting pop sounded like a starter pistol and I spent the rest of the afternoon wondering the mistake that causes ev charger motherboards to fry as I stared at my expensive mistake. Pull the wires out one by one, and ensure the new cable’s wire ends (ferrules) are clean and unbent.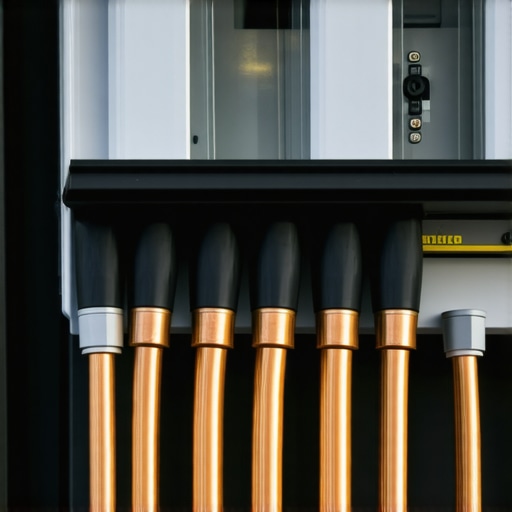
Get the Torque Settings Right Every Single Time
This is the ‘secret sauce’ of electrical work. EV charging isn’t like a toaster; it pulls a massive, continuous load for hours. If your connections are even slightly loose, they will vibrate, heat up, and eventually melt. This is why your breaker gets hot to the touch during charging and why cables fail at the source. Use a torque screwdriver. If the manual says 2.5 Newton-meters, don’t just ‘hand tighten’ it. I used to think my ‘calibrated elbow’ was good enough until I saw a terminal block char into a piece of black charcoal because of a half-turn of slack. Understanding why your charger needs a specific torque setting to pass inspection will save you from a catastrophic failure six months down the road. Once the new cable is torqued down, give each wire a firm ‘tug test’ to ensure it’s seated deep in the lug.
Stop Believing You Need a 200-Amp Panel for Every EV
A common myth in the EV world is that you cannot safely charge a car without a massive, expensive service upgrade. I’ve seen homeowners drop five thousand dollars on a new panel before they even took delivery of their Tesla, only to realize later they didn’t have to. The nuance that most people miss is the power of dynamic load management. If you know how to add an ev charger without a 200-amp panel upgrade, you can use a load-shedding device that monitors your home’s total draw. It briefly throttles the charger if the dryer and oven kick on simultaneously, ensuring you never exceed your panel’s capacity. Learning how to use load shedding devices to avoid a full service upgrade is the difference between a smart installation and an over-engineered one. #IMAGE_PLACE_HOLDER_C#
Why Does Your 50-Amp Breaker Trip When the Math Says it Should Work?
This is the advanced question that keeps most DIYers up at night. You’ve replaced the cable, your torque settings are perfect, yet the breaker still clicks off after two hours. The answer usually isn’t a short circuit; it’s thermal fatigue. According to a technical report by the Electrical Safety Foundation International (ESFI), EV charging is categorized as a ‘continuous load,’ meaning it pulls its maximum rated current for three hours or more. This sustained heat can cause certain components to expand and contract. If you are using a cheaper brand, you might find the specific breaker brands that are known to overheat with evs are simply not built for that level of thermal stress. This is also why the gfci in your panel keeps nuisance tripping your charger, as the internal sensors can get confused by the high heat and the pilot signal’s minor leakage current.
The One Code Violation That Fails Inspections Every Time
Even if your charger is working beautifully, a city inspector can shut you down for a single overlooked detail: the ‘working clearance.’ I’ve seen perfect wiring jobs get red-tagged because the homeowner mounted the unit too close to a storage shelf or too high from the floor. Understanding ensuring code compliance when installing ev chargers means respecting the three-foot clear space in front of the panel and the charger itself. If you’re worried about your setup, checking why the city inspector failed your garage wiring can give you a roadmap of what they’re actually looking for during the walkthrough. It’s rarely the big stuff; it’s usually the small, technical rules about conduit support and label clarity. This is the stuff that separates a weekend hobbyist from an expert. Have you ever fallen into this trap or had an inspector find something you totally missed? Let me know in the comments below.Most people think once the station is on the wall, the job is done forever. I used to think that too, until I realized that 48 amps of continuous current is basically a slow-motion earthquake for your electrical connections. Over time, those thermal cycles—heating up while charging, cooling down at work—can actually back out your terminal screws. This is exactly why your main lugs might be loose after a year of charging. I’ve made it a habit to pop the cover once a year for a quick preventative health check to ensure nothing is vibrating its way toward a short circuit.
How can I keep my charging setup running like new for a decade?
It starts with software as much as hardware. If you have a smart unit, you need to know how to update the firmware on your smart charging station because manufacturers often push patches that manage heat more efficiently or fix handshake bugs with newer car models. On the physical side, I keep a small kit of the essential spare parts to keep for your home charging unit, including an extra J1772 holster and a set of replacement terminal ferrules, so a minor mechanical failure doesn’t leave me stranded.
The Three Tools That Saved My Charger from a Meltdown
I don’t go anywhere near a high-voltage box without my FLIR thermal camera. It might seem like overkill for a home garage, but seeing a 140-degree hot spot on a breaker before it trips is like having X-ray vision for fire hazards. According to thermal imaging documentation from FLIR, even a slight increase in electrical resistance creates a heat signature that is invisible to the eye but obvious on a sensor. If you’re serious about ev-charger-troubleshooting-expert-tips-for-common-issues, a budget-friendly thermal imager is the best investment you’ll make to catch loose wires before they char. 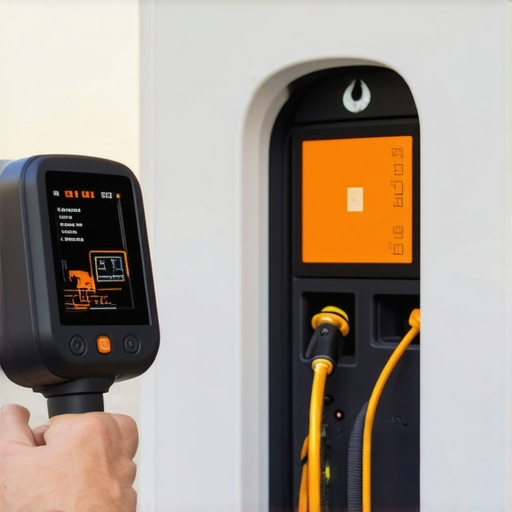 Next, I never trust my hand-tightening skills anymore. I use a calibrated torque screwdriver for every single connection. If you aren’t sure if your original installer did it right, learning how to verify code compliance for your ev charger installation is a great way to audit your own system for safety.
Future-Proofing for the Two-EV Family
We are moving toward a world where one charger isn’t enough. Instead of jumping straight to a massive service upgrade, consider upgrading your panel for better ev charging performance by looking into subpanels or smart energy managers that can share a single circuit. I predict that within five years, V2H (Vehicle-to-Home) technology will be standard, and your charger won’t just be a straw for your car—it will be the bridge that powers your house during a blackout. Go ahead and grab a torque wrench and check your terminal tightness today (with the power off!). It is the easiest way to prevent a three-hundred-dollar service call next winter.
Lessons I Paid for in Blown Breakers and Melted Plastic
After years of tinkering with Level 2 units, I’ve realized that your nose is often your best diagnostic tool. If you ever catch a faint whiff of ozone or “hot electronics,” don’t ignore it; that is usually the reason your ev charger smells like burnt plastic and it means a connection is failing under load. Another lightbulb moment for me was realizing that I didn’t always need a massive service upgrade; often, simply upgrading your panel for better ev charging performance through smarter organization and better breakers is enough to handle the load. Finally, never assume a ‘smart’ charger is smarter than a physically loose wire. If you are troubleshooting ev charger connectivity problems, check the physical terminal blocks before you spend hours blaming the Wi-Fi signal. These small reflections have saved me more money than any manufacturer warranty ever could.
Tools That Saved My Sanity and My Spare Breakers
I don’t consider a repair finished until I’ve used these three things to verify the work. First, a calibrated torque screwdriver—it’s the only way to be 100% sure you’ve met the manufacturer’s specs for continuous high-amperage draw. Second, a reliable non-contact voltage tester to ensure I’m not about to get a 240V surprise while working. Third, I always keep a digital copy of how to verify code compliance for your ev charger installation on my phone to double-check my work against local requirements before closing the housing. These aren’t just ‘nice to haves’; they are the barrier between a successful DIY repair and a dangerous electrical fire. #IMAGE_PLACEHOLDER_E#
Stop Fearing Your Garage Electrical and Take Charge
The goal of all this isn’t just to save a few hundred dollars on a new station—it’s to give you the confidence that your home is safe while you sleep and your car is plugged in. Taking the time to understand the internals of your system means you won’t be caught off guard when a cable frays or a breaker trips unexpectedly. Your car is a massive investment, and your home is your sanctuary. By staying on top of ev-charger-troubleshooting-expert-tips-for-common-issues, you ensure both stay in peak condition for the long haul. You’ve got the tools and the knowledge; now go make that connection solid and get back to enjoying the drive. Have you ever opened up your charging station and found something surprising inside, like a loose wire or a spider nest? Let me know in the comments below!